Acoustic Guitar String Changing
Author: Artist Guitars
Find out the best way to change your strings for optimum tuning & stability
Learn how to change strings on your acoustic (steel string) guitar like a pro ! This article will show you how to do a perfect string change. Check out how to change Classical guitar strings here. More blog's coming soon on Electric guitar string changing. When you change your strings be careful to keep your guitar in tune at all times, and replace 1 string at a time (1 by 1). Your guitar likes to be tuned, if you take off all the strings it can affect the neck.Step 1
Lie your guitar down on a nice flat surface (a desk or table is often a good place)
Step 2
Remove just one of your strings (its really important to do these one at a time), just keep loosening the machine head till the string is completely loose, when the string is loose you can just unwind from the machine head. Now that your string is loose (make sure its really loose) you can remove the bridge pin, its easier if you use a string winder as they often have a little section to remove the bridge pin with.
Pro tip - use a string winder, a string winder will make this step a lot easier and quicker
Step 3
Now take your new string from its packet and bend the end of the string. This helps the string not get caught under the bridge pin. The role of the bridge pin is to just hold the string in place, the strength of the string actually comes from the string touching the underside of the top of your guitar. You should never need to force the bridge pin in, if you do it makes them very hard to remove.
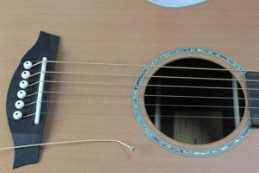
Step 4
Place the bent string into the bridge and gently push the bridge pin in, its important not to force it. Then you can pull back on the string (see picture) to make sure the string is securely connected to the sound board. When you do this if the bridge pin comes out you might need to bend the string a little more, or just hold the top of the pin when you pull back on the string, just remember never wedge the bridge pin into the saddle as this will make it really hard to remove when you next change your strings.gif)
Step 5
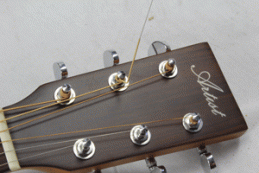
Now you have to work out how much of the string you need to cut off, lie the string flat on the guitar and go 8 cm past the machine head. the goal is to get 3-4 turns on the machine head, if you get too many of too few turns it will make it hard to keep in tune. Now you have measured cut the string (a pair of side cutters is ideal for this)Step 6
Now put the string into the machine head so just about 2mm can be seen on the other side and bend the string so it is locked in place, now wind the string on.Step 7
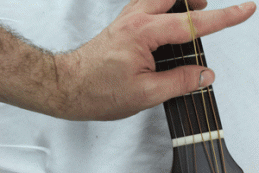
Use your hand to make sure the string has tension while it is still loose. This helps the string go on on nice and neatly. Tune your string up to pitch (when the slack has been taken out of the string you can remove your hand). Try and make sure the string doesn't go through the nut while you tune as it will wear the nut down (and may make it too low eventually)
Step 8
Now if you have done everything correctly the string will be in tune and you will have 3-4 turns of string on your machine head. You should now cut off the excess string as close to the machine head as possible so that it can't hurt you.
Step 9
Now this is the critical step to a perfect string change. Play the note, then pull on the string and play the note again. Does it sound like the string is lower in pitch ? If it does you have some slack in your string and you need to remove it. Pull on the string again and test it to see if the note changes pitch at all, you might need to do this 3-4 times.

Congratulations ! You now know how to change your strings like a professional !